Microbit temperature sensor
The microbit circuit board has a lot of sensors. One of them is the temperature sensor, located inside the CPU (central processing unit, the “brain” of the microbit and any digital device). It measures the air temperature around the microbit in Celsius, but using a tiny bit of programming the students can write some code that can convert that to Fahrenheit, even Kelvin! It is not designed to be measuring the temperature of liquids, like water.
This sensor data is not that reliable, since the sensor itself, as we said, is in the CPU, and if working very hard, the CPU may produce some heat of its own and meddle with the measurements. Nevertheless, the circuit board is great for scientific school studies 🙂
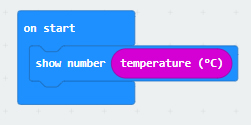
This is how a basic temperature measuring program looks like:
When a device is measuring temperature, it is called a thermometer. And when a device may be triggered (and act in a certain preprogrammed way) by the change of the temperature, it is called a thermostat. Let me give you a couple of ideas for activities and projects with the microbit acting as a thermometer and a thermostat.
Microbit thermostat activity ideas:
Idea 1: The microbit measures the room temperature (leave it for at least 1-2 minutes before the measurement, so it has time to equalize its temperature with that of the air) and then acts in a certain way if the results are in a specific range. For example, if the temperature is considered “comfortable” (let’s say 20°C-22°C) then the microbit shows a smiley face on its LED display, if the temperature is below that, show a sad face.
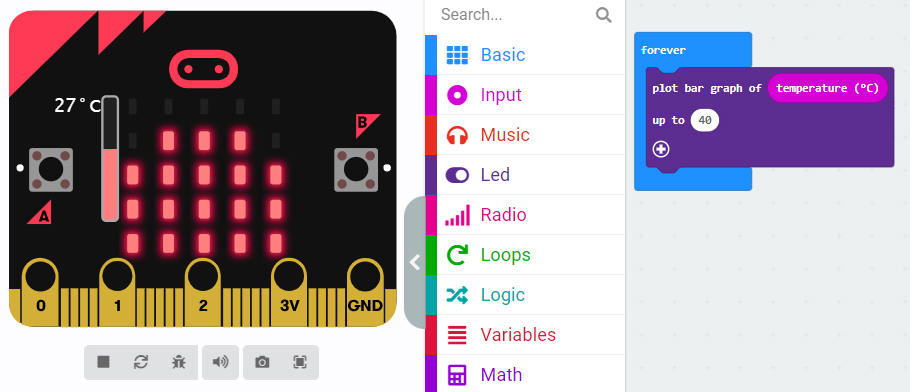
Idea 2: Bar graph of the temperature, with a “forever” loop event, so you can see the results change when you move the microbit around. Try placing the microbit in your pocket, under the A/C, next to the window, next to the door, above a hot beverage (better if it’s placed inside a transparent zip lock bag in this case, so moisture doesn’t go inside the microbit’s micro electronic elements), or inside a bowl full of ice (again, in a zip lock bag or some other transparent small bag). This is how the simplified code looks like:
Microbit thermometer activity ideas:
Idea 1: (A favorite of mine!) Students program a simple 3 block thermometer at the end of a lesson, in the last 5 minutes. The blocks are: “on start” event (could also be done with the “button A pressed”), “show number”, “temperature” sensor data. After that, in the day of the next lesson, go to the students, hand them their microbits and tell them to do a couple of air temperature readings throughout the day before the Tech lesson, and to write down the answers on a piece of paper. After that, when they come in the computer lab, they have to copy their measured data into Excel or a similar program, and then create a line chart of it.
Idea 2: On the press of button A the temperature is measured in Celsius (default is Celsius, nothing special to do or code), button B shows the temperature in Fahrenheit (use the conversion formula), and button A+B shows the temperature in Kelvin (conversion formula is very easy, implement it into the code)
Place ideas to test the microbit thermometer:
- under direct sunlight
- in your pocket
- under the A/C
- hair dryer blowing at it
- next to the window
- next to the door
- under the desk
- in your shoe
- above a hot beverage (should placed inside a transparent zip lock bag, so moisture doesn’t go inside the microbit’s electronic elements)
- inside a bowl full of ice (again, in a zip lock bag or some other transparent small bag)
- inside a fridge
- inside a working oven (just for 10 seconds, without closing the oven door, the goal is not to damage the microbit after all, ha ha)
If you want to get something already done, ready to use in the classroom right away, you can purchase my microbit temperature sensor activities from TpT. I will link them below.

Microbit temperature sensor activity with 7 tasks Thermometer coding measuring
The resource includes 7 different tasks and it’s all you need to teach a mix of science, coding and technology. It also includes answer keys, teacher notes, a table to fill with readings, a theoretical part and so much more! Tasks description: 3 of them are for coding, 1 of them is for measuring and writing down the gathered data in a printable table, 1 of them is to compare the microbit temperature measuring to the readings of an actual thermometer, 1 of them is to systemize the gathered data and record it in a digital spreadsheet (Excel or something else), then to calculate the average, and 1 of them is for a group discussion, comparison, ranking of data and giving away two certificates; a total of 7 different, fun and engaging microbit tasks that can be done all at once if you have more time (90-120 minutes), or in separated lessons through the course of 2-3 weeks. Click here to go to TpT and have a look at this product.
Microbit temperature sensor Thermometer Thermostat activity 2 tasks bar graph
This resource contains a microbit coding activity with 2 different tasks (one of them is to create a bar graph of the temperature), a theoretical part explaining the coding blocks used, some fun facts, answer keys to the programs and the actual *.hex files with the complete code, ready to be dragged and dropped in the makecode coding environment where you can instantly edit it, use it and show it on the simulator or upload it to your microbit. Click here to go to TpT and have a look at this project.
