Did you know that your micro:bit, even though it doesn’t have a dedicated light sensor, can still sense and measure light? I’ve done so many activities at school on the topic, and the students are always fascinated! The secret lies in using the LEDs on its display in a clever, reverse-engineered way. And it’s so much easier than it sounds! This trick is a fun and engaging way to explore the principles of electronics and coding with your students. Let’s dive into how it works and how you can incorporate it into your lessons.
How Does It Work?
The micro:bit’s LED display is made up of 25 tiny LEDs arranged in a 5×5 grid. Normally, these LEDs emit light to display patterns, text, or animations, depending on your code. However, LEDs can also work in reverse – they can detect light! This phenomenon is based on the same principle that makes solar panels work: a photovoltaic effect. When light hits the LED, it generates a small electric current, which can be measured by the micro:bit.
By programming the micro:bit to detect this current, you can measure the relative brightness of the surrounding environment. I like using a coded bar-graph and a flashlight on the microbit for example purposes. It’s not as precise as a dedicated light sensor, but it’s a great way to demonstrate the dual nature of LEDs and the concept of reusing components for multiple purposes.
How to Code It
Here’s a simple example of how you can program your micro:bit to use its LEDs as a light sensor, using a bar graph:
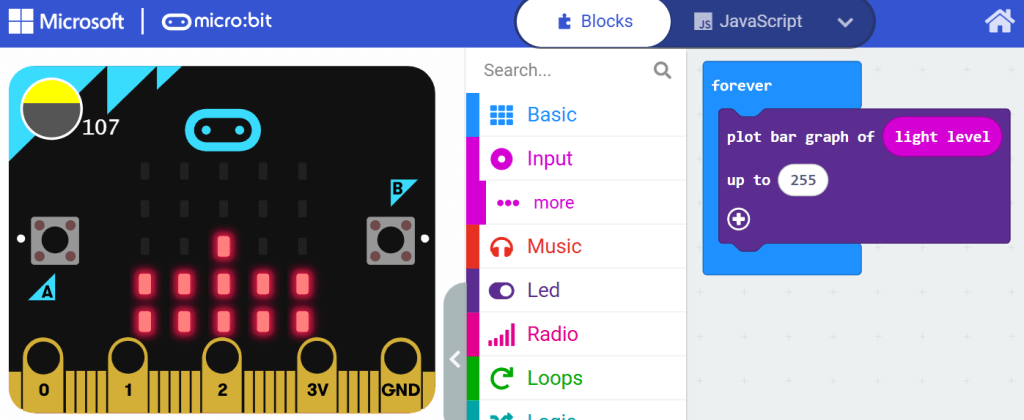
It’s very simple. A bar graph of the (Input menu) light level data, that is up to 255 (the maximum possible measurable amount), all of it constantly being done over and over again in a forever event loop. That’s it! It was too simple, right? I know! Go and test it out. Once you shine a flashlight on the LED matrix of the microbit, the bar graph goes higher. You can even test with the example light level simulation in the makecode coding environment.
You can also simplify the code even further, by making the microbit show the light level in numbers, by pressing a button. Here’s how, it’s self-explanatory:

Here are 2 screenshots I made of the finished bar graph project and how it looks like in my computer lab.


You can watch a video (it’s where I took the screenshots from) of the finished bar graph project by clicking this link here – “Measuring light with a bar graph using MICROBIT and a light smiley program – easy and fun coding”
Classroom Ideas
This activity opens up many opportunities for hands-on learning and fun classroom activities, here’s some ideas:
Data Collection activity: Use the light sensor functionality to record light levels over time and different places and analyze the data. You can always display the light level number (which will be between 0 and 255, 0 being absolutely no light, and 255 – the brightest possible situation) on the LED matrix instead of plotting it on a bar graph. Example – light under a student desk is 26, and light next to the window is 198.
Creative Projects: Incorporate the light sensor into games, art projects, or environmental monitoring tools.
Microbit BEGINNER activity Measuring LIGHT using a bar graph and coding 2 different tasks

This is one microbit light sensor resource I created some time ago. I’ve been using it for many years and it’s the perfect starting point on the topic. It’s about measuring light and then using the light data that is gathered to do different things. The first task is about creating a bar graph of the light levels on the microbit’s LED matrix, and the second task is using this data for some fun animations (a smiley face and a sad face on the microbit’s LED matrix).
Why Teach This?
Using LEDs as a light sensor is an excellent way to teach resourcefulness and innovation. It shows students how technology can be repurposed in unexpected ways and fosters a mindset of curiosity and experimentation. Plus, it’s a practical demonstration of how everyday electronics work, which can demystify technology for younger learners. AND it requires little coding, making it perfect for almost-beginners!
